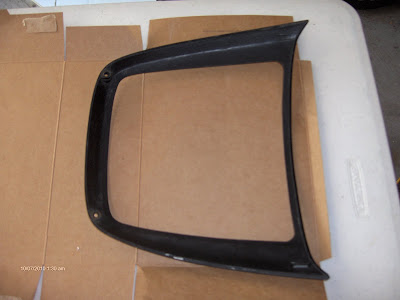
Ever since I bought the bike I wondered why doesn't my bike have windshield in front of the headlight. Every other bike I see has. At first I thought it was just an older model I have but more and more I became convinced I am missing it. Who knows what might've happen. Maybe got hit with the rock. Whatever is the case I need to find one.
Since the bike is getting up in the age and is rare as it is I was not able to find one. So it seems that I have to fabricate something myself......
From Menards I got .093 Polycarbonate Plexiglas sheet for a different project and that was just the right size.
For next I found a cereal box for template.
Then I cut the cardboard smaller and taped it to light cowl so it wouldn't move when I trace it.
First I traced it with the marker so I know if it has moved even after taping. After that went around with compass tracing another line 1/8 of an inch in. Thinking that should give enough room for rubber seal between the shield and light cowl.
Than I cut the template out by the line I made last with compass and traced that on plexiglas. I recommend using brighter color marker.
That way it will show up better on black writing. Now scroll saw came really handy. Just in case I changed the blade on it to the finest so it wouldn't chip the plexiglas. After cutting it out I scraped the edges to get all the shavings off.
After removing plastic from plexiglas I installed it in the cowl.
Job's done! Had to move around a bit to take a pic so there would be some glare otherwise you could even see there was shield in front of it.
adVenture
About 1983 Yamaha Venture touring bike and repair tips.
Monday, July 26, 2010
Headlight
Tuesday, June 29, 2010
body work (front fender)
One of the cosmetic flaws on this bike was this huge hole in it. I am guessing the speedometer cable came loose from the gauge and hit the fender.
Ether way, whatever happened hole has to be fixed. I has been looking for used one that is in one piece but they seem to be hard to find. And when I do stumble over one the funds tell me "no"....
I think the hardest part is to create the same curvature over that hole. I mean I could just slap the fiberglass patch on it and keep adding until it is right but that would take a lot of resin and sanding later. So I devised a plan to create a molding and copy the shape over that hole. I am sure I am not the first to think of this but just in case if anybody hasn't yet :)
First off I cut off one side of the zip lock bag. For some reason fiber glass doesn't stick on plastic and material seemed to be stretchy enough to make the moulding.
I attached it on the same fender but further down with masking tape trying to stretch it as much as possible without braking it. Fender curves the same way from one end to another so there is no problem getting it just right.
Than I cut the desired size of fiber cloth and mixed the resin. First with plastic putty knife I sprayed some resin on plastic and than laid out the fiber cloth I cut earlier on the resin. Added more resin and made sure that all the areas of cloth got soaked in resin.
I let it sit until it got cured. I made just one cloth thick so there will be flexibility but you can make it thicker if you are looking for something more rigid.
I started off by rasping plastic down around the edges (first picture) about an inch wide to make room for fiber glass to stick on. Without that after sanding there will be no edges to hold and fiber glass patch will come off.
Than I laid the molding on the fender to see how everything fits.
Than I took the molding off again and laid out the patch for outside.
Reinstalled the molding.
Than I turned it over and stuck it in the cardboard box so that the molding part wouldn't lay on something and make it flat. Besides I need it to lay that way so I can spread out the resin and add another patch for bottom.
After sitting all night this is what it came out with. Moulding pealed right off. It's very smooth except for couple wrinkles you can see on the picture. I have to put on another patch anyways so that didn't really bother me.
From the side is also visible the contour I was looking for.
Now adding couple more patches of fiber glass it is ready for sanding.
I still strongly recommend finding better shape fender. Could be even different color when it is going to be painted like mine. The time and effort that goes in to getting it right is just not worth it. Unfortunately, '83 Yamaha Venture is fairly rare bike unlike Honda Goldwing that has parts and accessories laying all over the place. I was unable to find a different front fender without buying another complete bike.
All the fiberglass material, resin and sand paper was available in local Menards store.
Tuesday, June 15, 2010
Trailer Hitch
I always tried to avoid to buy a bike with a hitch in the back. Figured the engine had to do more work and had more stress than the bike without the hitch. Even though I upgraded from leather bags on Maxim (Very nice bike by the way! Those are made to last specially coming with drive shaft) to touring cases on '83 Venture I still had a sneaking suspicion that I will run out of space quick. Specially thinking when back seat will be occupied in near future ;-)
Another reason is that I also needed to figure out how take my guitar with me on rides. I have mounted a guitar case on cruiser but when you have touring bike with hard cases that will not be an option.
So finally I found the guy who was selling a hitch for Venture. When I asked him if it fits on '83 Venture he was willing to swear that it will....
Well, somebody's pants are on fire. When I got home didn't matter how I tried it will just not fit. Let's just leave out my frustration level. Not only that I had to do some cutting and welding I also had to buy and modify the pipe bender (see post about that).
I started off by leveling bike so that both tires are on the ground and supporting itself. I do realize when I am on the bike it lowers a bit so I have to compensate for that. Basically I found that if I leveled it with exhaust pipes in back it would be perfect.
When you work alone you have to be creative. So couple jack stands came really handy.
Had to cut off the brackets that mount to the frame cause pipes were too long. That was also prevented them getting on the way when bending pipes.
It is very time consuming to take all the parts off the bike when you do the welding.
And when you just mark it and weld it off the bike you might end up doing the fitting and weld bending many times...also time consuming. I found it to be a lot easier and faster to put soaking (not dripping) towels around everything and anything that you don't want to get welding slag on or get burned. Make sure you don't get the parts you want weld wet. Now I can tack weld the pieces together and the sparks and red hot slag will be extinguished as soon as they hit the wet towel. Than take them off the bike and finish welding without worry if it fits.
Also have to attach the flat iron for the down force of the hitch. I chose 1/4 x 1 inch flat iron. Original thought was to use angle iron but the side to side movement is taken care of by horizontal pipes I worked on earlier. So that becomes unnecessary, besides makes more difficult to keep things clean.
I welded them on the bottom solid and the top end bolted to the frame where rear fender bolts to.
I also liked the idea of being able to just unbolt the chrome piece when I have to change the tire. Instead of completely uninstalling the hitch.
After that some cleaning and grinding, priming and painting, and parts are ready to be installed.
Came out nice and strong. About 200lbs man can jump on the hitch and wouldn't budge.
Now having a hitch mounted is just the half of the job. The other half is electrical, lighting.....
Since the motorcycle lighting is European style I installed the converter cause the trailer was wired for US vehicles (witch means brake lights and blinkers are using the same light bulb).
I had to take off the rear trunk. That opened the way to cargo rack. 12mm socket helped me to take off the rear bolts and just get loose the bolts by the seat enough for me to lift up and open the way for the black plastic piece. That was held in place just by two fillips bolts.
After soldering all the connections and sealing them with shrink tubing I mounted the converter to the rear fender.
I chose the left side flat iron I welder to the hitch to come down with the wiring.
Zip tied the wiring and used the velcro to keep it from flopping around in the wind when I don't use the trailer.
You would think just hook up the trailer and you are all done.....wrong!
After I did hook it up I realized that I completely overlooked something.
Doing wiring on cars and trucks for countless times I didn't think what is the blinker relay amplitude. Trailer lights were doing anything but the right thing.
I had no choice but switch everything to European style. That meant rewiring the trailer. Also this means eliminating the converter that I mounted on the Venture's rear fender.
I had some motorcycle blinkers in my parts box and thought they would look just fine.
Biggest thing was to figure out how to add another wire to the connection at the hitch. Decided to use the ground (white wire) for brake lights at the 4 prong plug. The hitch is being used as a ground right now. We will see how that will work.
Even though adding now one more light bulb to blinker relay that makes it blink faster now you can actually understand the signals made by trailer lights.
Been debating about changing the blinker relay to something that will accommodate both bike and the trailer. Also if I change the light bulbs to LED would it be better with the current relay....
UPDATE! LED light bulb DID work. Blinkers are blinking at the right rate. Prevented me from switching the relay for higher amplitude. Who's to say I wouldn't have a problem riding without the trailer than...
Another reason is that I also needed to figure out how take my guitar with me on rides. I have mounted a guitar case on cruiser but when you have touring bike with hard cases that will not be an option.
So finally I found the guy who was selling a hitch for Venture. When I asked him if it fits on '83 Venture he was willing to swear that it will....
Well, somebody's pants are on fire. When I got home didn't matter how I tried it will just not fit. Let's just leave out my frustration level. Not only that I had to do some cutting and welding I also had to buy and modify the pipe bender (see post about that).
I started off by leveling bike so that both tires are on the ground and supporting itself. I do realize when I am on the bike it lowers a bit so I have to compensate for that. Basically I found that if I leveled it with exhaust pipes in back it would be perfect.
When you work alone you have to be creative. So couple jack stands came really handy.
Had to cut off the brackets that mount to the frame cause pipes were too long. That was also prevented them getting on the way when bending pipes.
It is very time consuming to take all the parts off the bike when you do the welding.
And when you just mark it and weld it off the bike you might end up doing the fitting and weld bending many times...also time consuming. I found it to be a lot easier and faster to put soaking (not dripping) towels around everything and anything that you don't want to get welding slag on or get burned. Make sure you don't get the parts you want weld wet. Now I can tack weld the pieces together and the sparks and red hot slag will be extinguished as soon as they hit the wet towel. Than take them off the bike and finish welding without worry if it fits.
Also have to attach the flat iron for the down force of the hitch. I chose 1/4 x 1 inch flat iron. Original thought was to use angle iron but the side to side movement is taken care of by horizontal pipes I worked on earlier. So that becomes unnecessary, besides makes more difficult to keep things clean.
I welded them on the bottom solid and the top end bolted to the frame where rear fender bolts to.
I also liked the idea of being able to just unbolt the chrome piece when I have to change the tire. Instead of completely uninstalling the hitch.
After that some cleaning and grinding, priming and painting, and parts are ready to be installed.
Came out nice and strong. About 200lbs man can jump on the hitch and wouldn't budge.
Now having a hitch mounted is just the half of the job. The other half is electrical, lighting.....
Since the motorcycle lighting is European style I installed the converter cause the trailer was wired for US vehicles (witch means brake lights and blinkers are using the same light bulb).
I had to take off the rear trunk. That opened the way to cargo rack. 12mm socket helped me to take off the rear bolts and just get loose the bolts by the seat enough for me to lift up and open the way for the black plastic piece. That was held in place just by two fillips bolts.
After soldering all the connections and sealing them with shrink tubing I mounted the converter to the rear fender.
I chose the left side flat iron I welder to the hitch to come down with the wiring.
Zip tied the wiring and used the velcro to keep it from flopping around in the wind when I don't use the trailer.
You would think just hook up the trailer and you are all done.....wrong!
After I did hook it up I realized that I completely overlooked something.
Doing wiring on cars and trucks for countless times I didn't think what is the blinker relay amplitude. Trailer lights were doing anything but the right thing.
I had no choice but switch everything to European style. That meant rewiring the trailer. Also this means eliminating the converter that I mounted on the Venture's rear fender.
I had some motorcycle blinkers in my parts box and thought they would look just fine.
Biggest thing was to figure out how to add another wire to the connection at the hitch. Decided to use the ground (white wire) for brake lights at the 4 prong plug. The hitch is being used as a ground right now. We will see how that will work.
Even though adding now one more light bulb to blinker relay that makes it blink faster now you can actually understand the signals made by trailer lights.
Been debating about changing the blinker relay to something that will accommodate both bike and the trailer. Also if I change the light bulbs to LED would it be better with the current relay....
UPDATE! LED light bulb DID work. Blinkers are blinking at the right rate. Prevented me from switching the relay for higher amplitude. Who's to say I wouldn't have a problem riding without the trailer than...
Monday, May 31, 2010
Pipe bender modification
Pic.1. Thick walled half inch pipe is not easy to bend without kinking it. So I had to invest in to another tool...
Pic.2. Since I was fixing it not rebuilding I had to do some modifications to pipe bender. Some of the bends on pipes made previously made difficult for me customize it.
Pipe kept twisting and prevented me to make a bend needed....
Pic.3. Here is the view after customizing the pipe bender on the top and.....
Pic.4. here is the side view. I made an extra hole for the bolt going through. You can count the holes on one side and than the other side. This worked really nice. I figured bending an half inch pipe doesn't make much difference in structural integrity.
Sunday, May 30, 2010
Foreword
This year I purchased an '83 Yamaha Venture. It has been my dream of belonging in the touring bike family.
It came pretty cheap and the reason for it is that it needed quite a bit of work. All though it didn't look much it rode pretty well. Have seen newer models that were in way worse shape than this one.
Like I said the look was something to wish for but I knew that is a lot easier to work on than something in the engine like second gear. I was told that the second gear issue was taken care of when I asked the seller and that was big factor of buying this bike.
Seat had a little rip in the front but otherwise really nice shape considering it's original. That is something that will be rebuilt.
A hydraulic foot brake that is not only for the rear tire but also to the left front brake caliper wasn't working. Had to buy a rebuild kit that was about 75$. Also had to replace the hose to the overfill container that was rock hard. Took long time to bleed the system but with the help of vacuum pump and an external bleeding container made the job clean and easier. Brake pads are good for now.
Windshields have been always a trouble to keep them clean without scratching. Same thing with this one. It's not too bad but it does need to be replaced eventually. That will be close to 100$.
For now it will be fine specially since being a tall guy I can look over it.
Front tire was bald like the Howie's head. Had to change that also, that was also around 70$.
Rear tire should go a season or two.
Biggest trouble I had with was speedometer. It didn't show speed nor counted mileage. Owner disconnected the cable cause it was making a racket. Had to open it up and found the problem.
It was completely messed up inside. Bell housing came loose and that's what was making the noise. This part was not repairable even though I sure tried. Found an old Virago speedometer and stole the guts from that. Well, it was counting mileage now but still no speed. Eventually I found newer Venture speedometer that fit right in. Trouble is it still needs to be calibrated. HINT: To get to the speedometer you only need to loosen two bolts. BUT to get to those you have to take off the windshield, fairing around the light(two screws on the bottom front) and headlight(one screw on each side of the light). Looking in from the hole where headlight was you can see two bolts facing you a bit angled. With an extension and 10mm socket and the speedometer is ready to come out. You have to lift it a bit so that little pegs in rubber grommet would allow to come out. Now there are tree electrical connectors and one big connector in the middle of the speedometer. Once you get those off you have the speedometer cable. AND off it comes....
Going 60 mp/h shows me about 72. I could handle little error but that will not work. Right now I am using actually GPS that shows me also speed. Very quick and responsive.
Greatest ugliness came from the fact that it has been sitting in the sun a lot and most of the maroon paint was cooked, faded and cracked. It will have to be painted. It will be Dodge Viper blue. Considering two tone.
Also thinking about trying my hand in pin striping. That will be ether racing red or silver.
Have been thinking about light blue ghost flames but I think that will not look good on touring bike.
Doing all that and running between my computer to find information about the darn bike online I actually realized that there is no repair manual for it. NONE!!
That was something I really ........ didn't like......and THAT made me create this blog. I hope if you read this you find something useful and are little better off than me.
Subscribe to:
Posts (Atom)